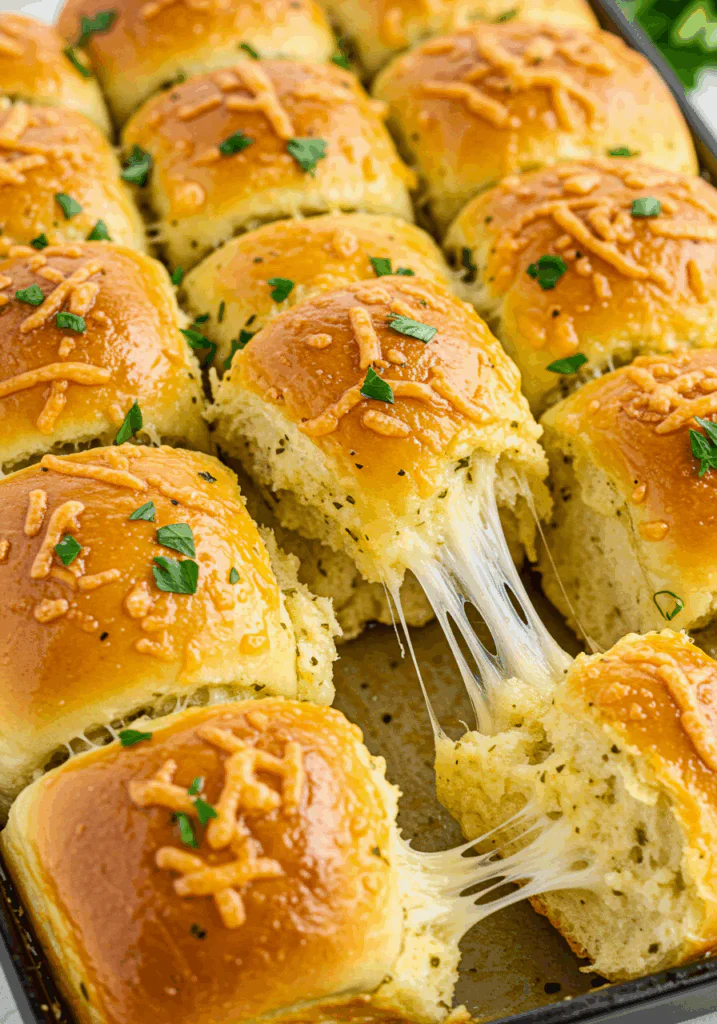
Golden, gooey, and packed with flavor, this Cheesy Pull-Apart Garlic Bread is the ultimate crowd-pleasing appetizer or side dish. Made with soft bread, plenty of melted cheese, and a garlicky herb butter, each bite is perfectly crisp on the outside and irresistibly cheesy on the inside. Whether you’re serving it for game night, a dinner party, or alongside your favorite pasta dish, this pull-apart bread is sure to disappear fast.
Want recipes like this delivered straight to your inbox? Subscribe now to get the latest culinary creations you’ll love.
Why You’ll Love This Recipe
Perfectly Cheesy – Every layer oozes with melted mozzarella and Parmesan.
Crispy on the Outside, Soft Inside – The ideal contrast in every bite.
Garlicky Goodness – Butter, garlic, and herbs give it bold flavor.
Great for Sharing – The pull-apart style makes it fun and interactive.
Easy to Make – Uses store-bought bread for a simple, delicious upgrade.
Ingredients You’ll Need
- 1 round artisan-style bread loaf (sourdough or Italian, about 8–10 inches wide)
- 1½ cups shredded mozzarella cheese
- ¼ cup grated Parmesan cheese
- ½ cup unsalted butter, melted
- 3 cloves garlic, minced
- 1 tsp dried Italian seasoning or parsley
- ½ tsp salt
- ¼ tsp black pepper
- Optional: red pepper flakes for heat
Tools You’ll Need
- Bread knife
- Small bowl
- Pastry brush or spoon
- Baking sheet
- Aluminum foil
Step-by-Step Instructions
Step 1: Preheat & Prep the Bread
- Preheat your oven to 375°F (190°C).
- Using a sharp bread knife, cut the loaf diagonally into 1-inch wide slices, being careful not to cut all the way through—leave the base of the bread intact.
- Turn the bread 90 degrees and slice again to create a crosshatch pattern, forming small pull-apart squares.
Step 2: Make the Garlic Butter
4. In a small bowl, combine melted butter, minced garlic, Italian seasoning, salt, and black pepper.
5. Stir until well blended.
Step 3: Fill with Cheese & Butter
6. Gently pull apart the bread sections and spoon or brush garlic butter into all the crevices.
7. Stuff shredded mozzarella and Parmesan evenly throughout the cuts—use your fingers or a small spoon to press it deep into the bread.
Step 4: Wrap & Bake
8. Place the stuffed loaf on a sheet of aluminum foil and wrap it loosely to hold everything together.
9. Bake for 15 minutes covered, then uncover and bake for another 10–12 minutes until the cheese is melted and the top is golden and crisp.
Step 5: Serve Hot
10. Garnish with fresh herbs or a sprinkle of red pepper flakes.
11. Serve immediately while warm and melty—just pull apart and enjoy!
Tips for the Best Pull-Apart Garlic Bread
Use Crusty Bread – Sourdough or artisan loaves hold up best to stuffing and baking.
Don’t Skip the Second Bake – It crisps the top and melts the cheese fully.
Double the Garlic Butter – For extra indulgence, increase the butter mix.
Add Herbs Fresh – Sprinkle chopped parsley or basil after baking for a fresh finish.
Serve Hot – This bread is best fresh out of the oven.
Serving Suggestions
Pasta Night – Serve alongside spaghetti, lasagna, or fettuccine Alfredo.
Party Platter – Pair with marinara sauce, ranch, or garlic aioli for dipping.
Soup Companion – Perfect with tomato soup or creamy broccoli cheddar.
Brunch Table – Add it to a savory brunch spread with eggs and veggies.
Game Day Snack – A guaranteed favorite for guests to tear and share.
How to Store & Reheat
Storing:
- Wrap leftovers in foil and store in the refrigerator for up to 3 days.
Reheating:
- Oven: Reheat at 350°F wrapped in foil for 10–15 minutes.
- Air Fryer: Heat at 350°F for 5–6 minutes for crispy results.
- Avoid microwaving—it softens the bread and can make it soggy.
Frequently Asked Questions
- Can I use a baguette or French loaf?
Yes, but round loaves offer more space for stuffing. Baguettes will be more narrow and crispier. - What’s the best cheese to use?
Mozzarella melts best. You can also use provolone, Monterey Jack, or even pepper jack for a kick. - Can I prep this ahead of time?
Yes! Stuff and wrap the bread, then refrigerate. Bake just before serving. - Is it freezer-friendly?
It’s best fresh, but you can freeze after baking. Reheat from frozen in a 375°F oven for 15–20 minutes. - Can I make it vegan?
Absolutely—use vegan butter and dairy-free cheese shreds.
Final Thoughts
This Cheesy Pull-Apart Garlic Bread is everything a cheesy side dish should be: melty, garlicky, and totally irresistible. Whether you’re serving it as an appetizer or a comfort food side, it’s a guaranteed favorite that vanishes in minutes. Best of all, it’s simple to make and endlessly customizable to your favorite flavors.
Try it out and let me know what you think! Don’t forget to leave a review below and share your photos on Pinterest! I can’t wait to see your cheesy creations.
Preparation Time: 10 minutes
Cooking Time: 25 minutes
Cuisine: American
Nutritional Information (Per Serving – based on 8 servings):
Calories: 290 | Protein: 9g | Carbohydrates: 22g | Fat: 19g | Fiber: 1g | Sugar: 1g | Sodium: 430mg
Cheesy Pull-Apart Garlic Bread
- Total Time: 35 minutes
Description
Golden, gooey, and packed with flavor, this Cheesy Pull-Apart Garlic Bread is the ultimate crowd-pleasing appetizer or side dish. Made with soft bread, plenty of melted cheese, and a garlicky herb butter, each bite is perfectly crisp on the outside and irresistibly cheesy on the inside. Whether you’re serving it for game night, a dinner party, or alongside your favorite pasta dish, this pull-apart bread is sure to disappear fast.
Want recipes like this delivered straight to your inbox? Subscribe now to get the latest culinary creations you’ll love.
Ingredients
-
1 round artisan-style bread loaf (sourdough or Italian, about 8–10 inches wide)
-
1½ cups shredded mozzarella cheese
-
¼ cup grated Parmesan cheese
-
½ cup unsalted butter, melted
-
3 cloves garlic, minced
-
1 tsp dried Italian seasoning or parsley
-
½ tsp salt
-
¼ tsp black pepper
-
Optional: red pepper flakes for heat
Instructions
Step 1: Preheat & Prep the Bread
-
Preheat your oven to 375°F (190°C).
-
Using a sharp bread knife, cut the loaf diagonally into 1-inch wide slices, being careful not to cut all the way through—leave the base of the bread intact.
-
Turn the bread 90 degrees and slice again to create a crosshatch pattern, forming small pull-apart squares.
Step 2: Make the Garlic Butter
4. In a small bowl, combine melted butter, minced garlic, Italian seasoning, salt, and black pepper.
5. Stir until well blended.
Step 3: Fill with Cheese & Butter
6. Gently pull apart the bread sections and spoon or brush garlic butter into all the crevices.
7. Stuff shredded mozzarella and Parmesan evenly throughout the cuts—use your fingers or a small spoon to press it deep into the bread.
Step 4: Wrap & Bake
8. Place the stuffed loaf on a sheet of aluminum foil and wrap it loosely to hold everything together.
9. Bake for 15 minutes covered, then uncover and bake for another 10–12 minutes until the cheese is melted and the top is golden and crisp.
Step 5: Serve Hot
10. Garnish with fresh herbs or a sprinkle of red pepper flakes.
11. Serve immediately while warm and melty—just pull apart and enjoy!
Notes
Use Crusty Bread – Sourdough or artisan loaves hold up best to stuffing and baking.
Don’t Skip the Second Bake – It crisps the top and melts the cheese fully.
Double the Garlic Butter – For extra indulgence, increase the butter mix.
Add Herbs Fresh – Sprinkle chopped parsley or basil after baking for a fresh finish.
Serve Hot – This bread is best fresh out of the oven.
- Prep Time: 10 minutes
- Cook Time: 25 minutes
- Cuisine: American